|
SUPPORT
> E-Mail
> Opera Update Tutorial
Return to Support
How to configure OPERA to get your E-mail
This tutorial will explain how to change Opera's mail
client from the old mail system to the new. You can download Opera from
their site, Opera.com.
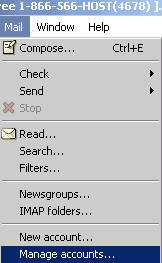
- Open Opera, click on the Mail menu, then "Manage accounts..."

- This will bring up the Manage Accounts window. Click
on the Edit... Button while selecting the account you are
updating.

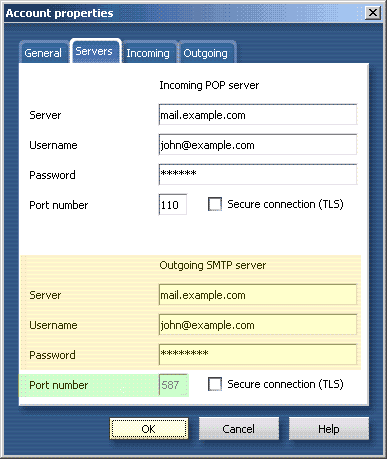
- In the Account properties window, click on the Servers Tab to enter the
new information.
- The Usernames on all e-mail accounts for the new system are the same as
the e-mail addresses themselves. If your e-mail address were john@example.com,
your previous username would have been 'john'. The new username for that
address would be john@example.com
- Note: If your ISP blocks Outgoing
mail from third party mail servers, You Must use your ISP's SMTP server.
You must contact them for this imformation. ProHosting does not know
your ISP's SMTP server.
- The Outgoing SMTP server now requires a Username and a Password.
These are the same as the username and password on the incoming mail
server. For instance, john@example.com

- Many ISPs block the default POP3 Sending port (25) on third party mail
servers (like the mail server for your domain). If you have difficulty sending
mail with the default server settings, you must find out your ISP's
SMTP mail server and use it.
- Make sure that you input your Outgoing Login information, or you
will not be able to send your mail. (unless of course you are using
your ISP's mail server to send the mail)
- There are several other items of interest in the other tabs, but
they are personal preference, and will not be addressed by this tutorial.
You should explore them for yourself.
- NOTE: In order to keep from taking up more
space on the Web server than is needed, Un-Check the "Leave messages
on server" checkbox.
- You have now successfully updated your mail account, and should be able
to check it. The default shortcut key for this is CTRL+K,
or you can check it from the menu on the top.
|
CALL
TOLL FREE: 866-566-HOST (4678)
ProHosting has hosted over 2,123,705 web sites since 1996!
|
|
